
 T.D.S. METERS
- These units have become popular for checking the
freshwater output of reverse osmosis and deionization units, by doing
so, one can tell with much greater ease, when such filtering cartridges
need to be replaced. I feel other than for those purposes, they have no
real use pertaining to our aquarium system's salt water. Quote :
" Since TDS meters are often used to test water "purity," it is
important to understand what they do not detect. As conductivity meters in
disguise, TDS meters will only detect mobile charged ions. They will not detect
any neutral (uncharged) compounds. Such compounds include sugar, alcohol, many
organics (including many pesticides and their residues), and unionized forms of
silica, ammonia, and carbon dioxide. These meters also do not detect macroscopic
particulates, as those are too large to move in the electric fields applied. So
if you see "rusty" looking water from iron oxide particulates, that won't be
measured. Neither will anything else that makes the water look cloudy. Bacteria
and viruses also won't be detected. "
T.D.S. METERS
- These units have become popular for checking the
freshwater output of reverse osmosis and deionization units, by doing
so, one can tell with much greater ease, when such filtering cartridges
need to be replaced. I feel other than for those purposes, they have no
real use pertaining to our aquarium system's salt water. Quote :
" Since TDS meters are often used to test water "purity," it is
important to understand what they do not detect. As conductivity meters in
disguise, TDS meters will only detect mobile charged ions. They will not detect
any neutral (uncharged) compounds. Such compounds include sugar, alcohol, many
organics (including many pesticides and their residues), and unionized forms of
silica, ammonia, and carbon dioxide. These meters also do not detect macroscopic
particulates, as those are too large to move in the electric fields applied. So
if you see "rusty" looking water from iron oxide particulates, that won't be
measured. Neither will anything else that makes the water look cloudy. Bacteria
and viruses also won't be detected. "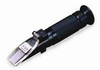 Refractometers
- The best and most accurate way to test for salinity.
Recently the price of such units has come down enough to allow any
hobbyists to be able to afford one, and with most units now having
automatic calibration included, they are also much easier to use. I
have to strongly recommend that you seriously consider purchasing one
simply due to their accuracy.
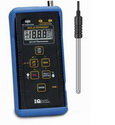
Refractometers
- The best and most accurate way to test for salinity.
Recently the price of such units has come down enough to allow any
hobbyists to be able to afford one, and with most units now having
automatic calibration included, they are also much easier to use. I
have to strongly recommend that you seriously consider purchasing one
simply due to their accuracy.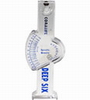 Swing Arm Hydrometers
- The most commonly used devices, and probably the easiest
to use. There is nothing technical about their use which requires
nothing more than filling them up to a set level and take the reading.
The only concern with their use is in ensuring there are no bubbles
sticking to the swing arm which would of course, make the swing arm
more buoyant and cause an inaccurate reading.
Swing Arm Hydrometers
- The most commonly used devices, and probably the easiest
to use. There is nothing technical about their use which requires
nothing more than filling them up to a set level and take the reading.
The only concern with their use is in ensuring there are no bubbles
sticking to the swing arm which would of course, make the swing arm
more buoyant and cause an inaccurate reading.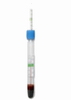 Floating Hydrometers
- These units, to put it bluntly, I find to be a real pain
to use since they must be temperature calibrated in order to get an
accurate reading. Of which I never seem to be able to trust and often
resort back to a swing arm type to put any doubts to rest.
Floating Hydrometers
- These units, to put it bluntly, I find to be a real pain
to use since they must be temperature calibrated in order to get an
accurate reading. Of which I never seem to be able to trust and often
resort back to a swing arm type to put any doubts to rest.  O.R.P. METERS ( oxication reduction potential ) - " Is a measure of the relative oxidizing power of the water. It has often been
recommended to aquarists as an important water parameter, and some companies
sell products (equipment and chemicals) designed to control ORP. Many who
recommended ORP control have convinced aquarists that it is a measure of the
relative "purity" of aquarium water, despite the fact that this has not been
clearly demonstrated. ORP, at its heart, is very, very complicated. It is, perhaps,
the single most complicated chemical feature of marine aquaria that aquarists
will typically encounter. It is not hard just for aquarists who are not
scientists. "
O.R.P. METERS ( oxication reduction potential ) - " Is a measure of the relative oxidizing power of the water. It has often been
recommended to aquarists as an important water parameter, and some companies
sell products (equipment and chemicals) designed to control ORP. Many who
recommended ORP control have convinced aquarists that it is a measure of the
relative "purity" of aquarium water, despite the fact that this has not been
clearly demonstrated. ORP, at its heart, is very, very complicated. It is, perhaps,
the single most complicated chemical feature of marine aquaria that aquarists
will typically encounter. It is not hard just for aquarists who are not
scientists. " P.A.R. METERS - " PAR
meters (also called quantum meters) are the preferred instruments for
measuring light intensity when photosynthesis is involved. Ideally,
quantum meters measure (and report as equal) the amount of energy in
light wavelengths between 400nm and 700 nm, and report it in units of
micromol per square meter per second
(µmol·m²·sec). Full intensity sunlight is
generally ~2,000 µmol·m²·sec. 'Micromol' is
the preferred unit for reporting purposes, as opposed to
'microEinstein', a unit that is commonly used in older literature.
However, any measure of PAR or PPFD (either
µmol·m²·sec or
µE·m²·sec) are still somewhat of 'outlaw'
units, not recognized as SI units, and something of buzzwords to those
obsessed with botany or phycology. "
P.A.R. METERS - " PAR
meters (also called quantum meters) are the preferred instruments for
measuring light intensity when photosynthesis is involved. Ideally,
quantum meters measure (and report as equal) the amount of energy in
light wavelengths between 400nm and 700 nm, and report it in units of
micromol per square meter per second
(µmol·m²·sec). Full intensity sunlight is
generally ~2,000 µmol·m²·sec. 'Micromol' is
the preferred unit for reporting purposes, as opposed to
'microEinstein', a unit that is commonly used in older literature.
However, any measure of PAR or PPFD (either
µmol·m²·sec or
µE·m²·sec) are still somewhat of 'outlaw'
units, not recognized as SI units, and something of buzzwords to those
obsessed with botany or phycology. "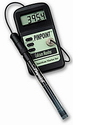 ELECTRONIC CALCIUM MONITORS - " Ion selective electrodes consist of a membrane that
responds electrically to the presence of specific ions in solution. In a sense
they are similar to pH electrodes that are sensitive to H+, but these respond to other ions instead. In the
case of calcium selective electrodes, the membrane material is typically PVC
(polyvinylchloride) that has been modified to be selective for calcium. "
ELECTRONIC CALCIUM MONITORS - " Ion selective electrodes consist of a membrane that
responds electrically to the presence of specific ions in solution. In a sense
they are similar to pH electrodes that are sensitive to H+, but these respond to other ions instead. In the
case of calcium selective electrodes, the membrane material is typically PVC
(polyvinylchloride) that has been modified to be selective for calcium. " OZONE GENERATORS / REACTORS - " Ozone is often used by reef aquarists to "purify" the
water. To most aquarists that means making the water clearer, and it certainly
does that in many cases. How to optimally accomplish that task without risking
the aquarium inhabitants' or the aquarist's health, however, is not always
obvious. This article is the second in a series that discuss the details of
ozone and its use in reef aquaria. "
OZONE GENERATORS / REACTORS - " Ozone is often used by reef aquarists to "purify" the
water. To most aquarists that means making the water clearer, and it certainly
does that in many cases. How to optimally accomplish that task without risking
the aquarium inhabitants' or the aquarist's health, however, is not always
obvious. This article is the second in a series that discuss the details of
ozone and its use in reef aquaria. "
 PH PROBES - " The success or failure of pH measurement depends on the proper application of
the probe and proper subsequent maintenance of the probe. The procedures
described within apply to the most common pH probe in use today and that is the
flat surface combination pH probe.
PH PROBES - " The success or failure of pH measurement depends on the proper application of
the probe and proper subsequent maintenance of the probe. The procedures
described within apply to the most common pH probe in use today and that is the
flat surface combination pH probe.
With that said, I have yet to hear of anyone who had a pH probe
that was accurate, as such, I would trust and depend upon a test kit
before I wasted my money on a probe that I could not trust. "
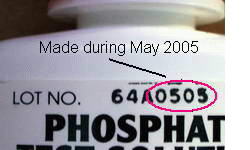 Aquarium Pharmaceuticals, Inc.
- This is one that requires you to find the test regeants
made date, which is stamped on the front of each bottle. The
various test kits have an avearge shelf life of three years
after the manufactured date. In the photo example, this particular
bottle was filled during May of 2005, which means that it is good up
untill May of 2008 if unopened. Once opened, they are good for up to
one year, as long as that one year still falls under the shelf life
expiration date. Which for this particular bottle, I would open
and use it by May of 2007.
Aquarium Pharmaceuticals, Inc.
- This is one that requires you to find the test regeants
made date, which is stamped on the front of each bottle. The
various test kits have an avearge shelf life of three years
after the manufactured date. In the photo example, this particular
bottle was filled during May of 2005, which means that it is good up
untill May of 2008 if unopened. Once opened, they are good for up to
one year, as long as that one year still falls under the shelf life
expiration date. Which for this particular bottle, I would open
and use it by May of 2007. 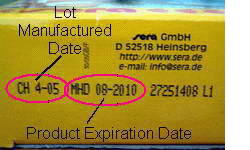 Sera Products -
This brand is thankfully obvious as to its shelf life expiration date.
Again, I would open and use the test kit(s) one year prior to its shelf
life expiration date.
Sera Products -
This brand is thankfully obvious as to its shelf life expiration date.
Again, I would open and use the test kit(s) one year prior to its shelf
life expiration date. 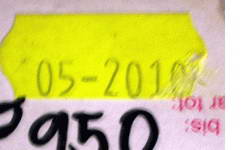 Salifert Test Kits
- Another one that is quite obvious as to its expiration date. As
with all test kits, they are only good for one year after they have
been opened/used.
Salifert Test Kits
- Another one that is quite obvious as to its expiration date. As
with all test kits, they are only good for one year after they have
been opened/used. 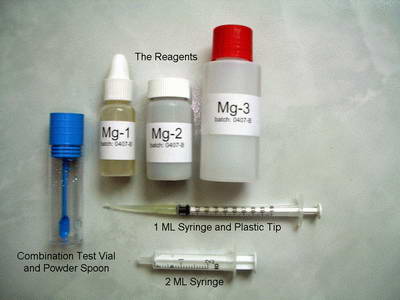
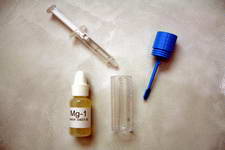
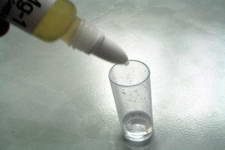 Add 4 drops of Mg-1
 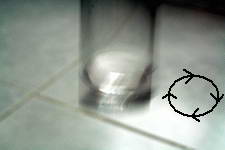 Swirl the vial gently for 30 seconds.
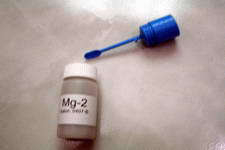 Add 1 level spoon of Mg-2 to the test vial
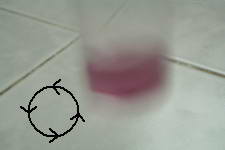 Swirl the vial gently for 10 seconds, the liquid should turn purple.
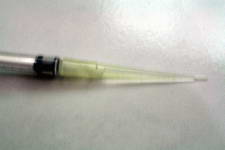 Place the plastic tip firmly on the 1 ml syringe. It is
important that this tip be used as its volume is part of the syringe's
measurement.
Place the plastic tip firmly on the 1 ml syringe. It is
important that this tip be used as its volume is part of the syringe's
measurement.  Place the syringe into the Mg-3 and draw the liquid in until the lower end of the black black syringe part is at the 1.00 ml
mark. It is common for some air to be drawn in also which
can be removed by holding the syringe upright (tip up) and rapidly
"flick" or "tap" the syringe to force all the air up to the tip
(just like you see in the movies), once all the air is at the tip,
push the plunger in to force out the air and then reinsert the tip back
into the Mg-3 regeant and draw in more liquid until you are at the 1.00 ml mark again. This will ensure you have exactly 1.00 ml within the syringe.
Place the syringe into the Mg-3 and draw the liquid in until the lower end of the black black syringe part is at the 1.00 ml
mark. It is common for some air to be drawn in also which
can be removed by holding the syringe upright (tip up) and rapidly
"flick" or "tap" the syringe to force all the air up to the tip
(just like you see in the movies), once all the air is at the tip,
push the plunger in to force out the air and then reinsert the tip back
into the Mg-3 regeant and draw in more liquid until you are at the 1.00 ml mark again. This will ensure you have exactly 1.00 ml within the syringe. 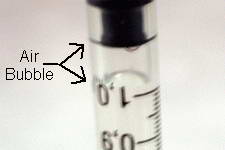 Even
with tapping to remove the air, it is okay to have a bit of a bubble
left over just as long as you pull the plunger back to where the
bottom of the bubble is at the 1.00 ml mark and there is a full
1.00 ml of regeant within the syringe.
Even
with tapping to remove the air, it is okay to have a bit of a bubble
left over just as long as you pull the plunger back to where the
bottom of the bubble is at the 1.00 ml mark and there is a full
1.00 ml of regeant within the syringe. Start adding the Mg-3
with the 1 ml syringe to the test vial drop by drop. After each
drop is added, gently swirl the vial for a few seconds and keep
repeating until the color of the vial's water changes from purple
to either blue or gray, which ever color comes first.
Start adding the Mg-3
with the 1 ml syringe to the test vial drop by drop. After each
drop is added, gently swirl the vial for a few seconds and keep
repeating until the color of the vial's water changes from purple
to either blue or gray, which ever color comes first.  Once the test vial's water has changed to either blue or gray, Stop!
 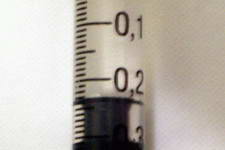 Hold
the syringe with the tip facing upward and read the position of the
upper end of the black syringe part. Each small mark or division
on the syringe corresponds to 0.01 ml In the example shown in the
photo, it reads as .23 and equates into 1,155 ppm of magnesium.
Hold
the syringe with the tip facing upward and read the position of the
upper end of the black syringe part. Each small mark or division
on the syringe corresponds to 0.01 ml In the example shown in the
photo, it reads as .23 and equates into 1,155 ppm of magnesium.