This mirror is being hosted with the permissions of the original content creator for preservation and educational purposes.
A source for informational links

Presented by Charles & Linda Raabe
Mactan Island, The Philippines
© 2011 All Right Reserved


  Having fully retired to the Philippine islands in 2004, I have had the unique opportunity to further my own understanding and experience with the keeping of reef aquaria, I have also been able to observe and learn first hand of the many reef habitats and the life they contain. Such observations do come with a risk in that I am also privy to the pressures faced by the reefs on a day to day basis.

  While some may blame our hobby for the decline of animals due to their capture and collection, there are a great many more destructive habits and reasons for such decline. We can not of course, be put fully to blame. But blame there is. I would be deceiving both you and me if I were to state otherwise. Our hobby does have an effect on wild stock. Such effects can only be negated by either stopping the collection of all animals for the aquarium trade, or by us, as hobbyists, learning to reduce our impact by the breeding and rearing of captive stock when ever possible.

Your best source for proper clean up crews!

  While the breeding of a great many species is still beyond our ability, nevertheless great strides have been made with a number of species. Many coral, fish and invertebrate species are now commonly reproducing in our aquariums. This is often to the credit of dedicated hobbyists who are not content with the keeping of a few pets, but take great joy in being able to provide those pets with the environment they need to thrive and reproduce. Each and every member of this hobby is capable of contributing to the knowledge that allows themselves and others to take a species one step closer to relieving the pressures our hobby can place upon the wild stocks.


  While the majority of our hobby has to work from the end of the supply chain, I have the chance to work at the beginning of it. When I am able to breed a specific species, I can then supply the local exporter here with captive bred stock thus reducing or even eliminating the exporter's need to collect that species from the wild in the first place. This is my goal with the Harlequin Shrimp.


Photo by Charles Raabe
A Mated Pair,  Female is on the left, Male is on the right.

    Without a doubt, the Harlequin Shrimp is one of the most elegant looking of the shrimp species. It is no wonder why they are fast becoming popular as pets. What I, as I am sure others find endearing about this shrimp is in the apparent closeness that mated pairs seem to share. Never, at any time, have I seen a mated pair any further apart than an inch or two, at most. I realize that this closeness is strictly to ensure a mate is always nearby, but it is endearing none the less. Even when busy with their own starfish, they will still remain side by side. These are very gentle, easy going shrimp and will not threaten any other life in the aquarium, with the exception of most starfish of course.


    As with any marine species, water quality plays an important role in ensuring they remain healthy. Being an invertebrate, shrimp do not tolerate anything less than reef grade water. If you can provide consistent water quality, you should have no trouble at all in being able to keep your pet healthy and free of problems.

  I prefer to keep my shrimp in their own dedicated tank for breeding purposes and observation. Therefore, I have put my shrimp breeding system in front of my reef aquarium's sump in order to facilitate water changes between the two tanks. As long as the reef aquarium has reef grade water quality this arrangement makes such a task very easy to accomplish and avoids any acclimation issues.

  If you must use a synthetic salt mix, prepare the water at least two days in advance of it being needed to allow it to age and become properly mixed and aerated. Prior to use,ensure the new waters pH, salinity and temperature match the water the shrimp are in. They are easily affected by sudden changes and any water changes done with synthetic mixes should be gradual, doing no more than ten to twenty percent at a time, allowing a day between changes. When using my reef aquarium's water, I have changed seventy five percent of their water with no ill effects. Again, I must stress the importance of water quality and not shocking the shrimp with rapid synthetic water changes. These factors alone account for many shrimp deaths.

  Being a timid species, it is also vital to ensure their aquarium is safe from predators or other animals that may harass them. Even a fast moving fish passing by can cause these shrimp stress and they may go into hiding and be unable to properly eat. For breeding purposes, I feel a tank dedicated to a single mated pair is a must. As pets, taking the simple precautions of having pump inlets protected and any possible predators removed will make keeping this species a simple matter. With good water quality, a peaceful environment and the proper food, you should have no trouble in maintaining this species for a good many years.


Photo by Charles Raabe   Photo by Charles Raabe
A Male (left) and Female (right) Mated Pair


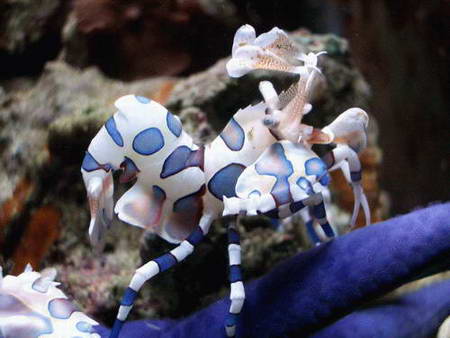
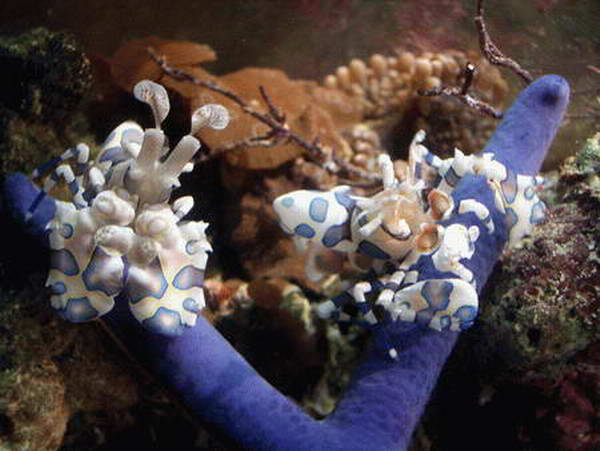
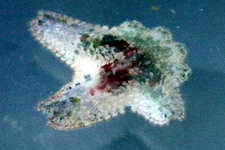
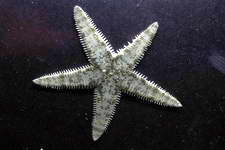
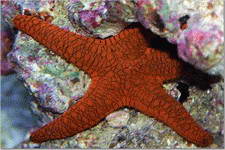
    This may not be easy for those that do not have access to a variety of starfish. While I have the luxury of being able to collect any starfish myself. For those of you that have to purchase starfish in order to feed these shrimp, you may wish to use some of the more prolific starfish such as the common Asterina species found commonly hitch hiking in on purchased live rock. Over the course of time, I have collected a variety of starfish species in order to determine which are found palatable or not, to the shrimp.

  If starfish are not available, in a pinch you can also try adding a small sea urchin. It has been reported that these shrimp have been known to eat the tube feet of sea urchins when starfish become scarce. I have tried small sea urchins, but my shrimp paid them no interest. I like to ensure that the shrimp have at least one decent meal each week, although they are capable of going three to four weeks without food. By keeping them well fed you will increase your chances of the female producing a great many more eggs.

  In order to avoid having to feed an entire starfish at one time it is a common practice to cut off one of the starfishes arms and feed that to the shrimp while keeping the remainder of the starfish in another aquarium. In due time, the starfish will regenerate its lost arm. By keeping a number of starfish, you can rotate through the starfish, having them each donate an arm when required. I find this method of feeding to not only be less wasteful of starfish, it also allows the shrimp to feed right away. It can take a few days for the shrimp to actually break through a starfish in order to get at the internal parts that they eat.

  Please do not add more than one starfish or starfish arm at each feeding. It is very common for the shrimp to combine their feeding efforts onto one starfish or starfish arm. Leaving the second starfish to crawl off, possibly wounded or having a second arm decay within the aquarium.

  When feeding the shrimp break off and release a great many of the starfishes spicules. These are microscopic structures that give the starfish its bodily support. Such spicules resemble microscopic needles which, I am sure, would be an irritant to corals. To reduce any chance of coral irritation when keeping harlequin shrimp in a reef aquarium, I would suggest using a micron filter to try and reduce the number of free floating spicules. Or, better yet keep your shrimp in a dedicated tank of their own.

  Once the feeding shrimp kill the starfish I do not allow it to remain in the aquarium longer than three to four days to avoid having the starfish pollute the aquarium water. Once a live starfish has been introduced to the aquarium, I take it out after two weeks whether or not the shrimp are done with it.

  While being fed, I perform daily water changes and continue to do so for a few days after the starfish carcass has been removed. A week later, I will feed the shrimp again. This is done to ensure the shrimp have enough energy for breeding, spawning and molting. If the shrimp are being kept solely as pets, then I would feed them at least once every two to four weeks. The times I have noted as to how long a starfish will last and/or degrade are simply averages. It will vary based on the size and species of starfish and how the shrimp happen to dismember the starfish.


  Acceptable Starfish species : Listed below are the starfish species that I have found to be a good food source for the harlequin shrimp. I have tried numerous brittle star species but the shrimp seem to be afraid of these and will not eat them. I believe this is because brittle starfish are fast moving and as they rapidly try to find a hiding place the shrimp are intimidated.

  If you do decide to try other starfish than the Linkia species, keep in mind that many of these starfish are predators of corals and other invertebrates. Should they escape the clutches of the harlequin shrimp, they could pose a real threat to your other reef inhabitants. This is yet another good reason to keep these shrimp in a dedicated aquarium of their own.

  When deciding upon a species of starfish to be used with the "sacrificial" arm method of feeding, I would chose the Protoreastors (Choc.Chip Stars) since they are easy to maintain and feed upon readily obtained seafood meats such as clams and oysters. Such a steady, meaty diet will ensure that the starfish can regrow its lost limb(s) much faster than other starfish groups. Species such as Linkias may not find their dietary needs being met and would most likely take a great deal longer to replace lost limbs, if they survive long term to begin with.

Photo by Charles Raabe Photo by Charles Raabe Photo by Charles Raabe Photo by Charles Raabe
                Blue Linkia                                          Asterina sp.                                    Archaster typicus                                Crown of Thorns

Photo by Charles Raabe
          Protoreastor nodosus                              Fromia Imdica  


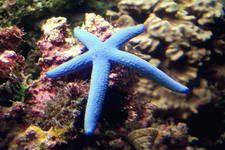
  Depending upon their health and quality of diet, the harlequin shrimp will molt an average of once each month. Prior to molting you can see the exoskeleton looking like an old dirty "skin". This seems to cause the shrimp great irritation just prior to molting. They will constantly pick at themselves as if trying to speed up the process by making the exoskeleton more loose by their tugging at it.

  As shrimp and other crustaceans grow, their exoskeleton does not grow with them and they must form a new exoskeleton to match their new size. During the period between molts they also repair themselves. If an antennae, leg or claw is lost new ones will grow and become evident after molting. It may take more than one molting period to fully repair any damaged or lost limbs. Keeping the shrimp well fed and in water of good quality will ensure they have the nutrient resources to complete such tasks. Even with such care, things can still go wrong for the shrimp during the repair process and the actual molting event. It is during molting that most shrimp losses occur.

  I have noted that over the course of a few months, a new pair will synchronize their molting. My pairs seem to do their molting within the same day of each other. This could be coincidental but is most likely done to facilitate mating. I am not in the habit of dosing my shrimp's aquarium with iodine and have not observed any ill effects from not doing so. I feel that the belief that shrimp somehow need iodine in the water in order to properly molt is unfounded. Keeping the water at the same calcium and alkalinity levels as you would for a coral reef aquarium should provide for the needs of the shrimp.

  Once molting has been completed, do not be surprised if the shrimp disappear out of sight for an extended period of time. They are extremely vulnerable (soft) to predators and they know it. After a few hours, their new exoskeleton will harden and they should make a reappearance. If not, you may try enticing them out with a starfish.

 Photo by Charles Raabe   Photo by Charles Raabe   
      Looking a bit haggard just prior to molting                     Climbing out of the old exoskeleton      


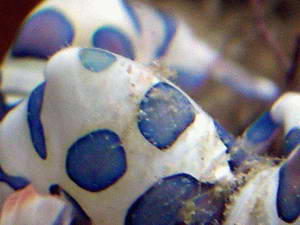
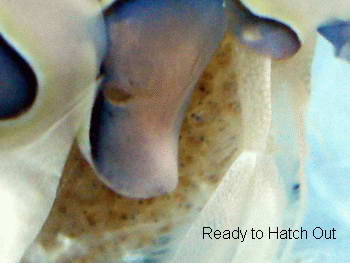
  This only occurs directly after the female has broadcast her spawn. Once all of the larvae have hatched, it is normal for her to molt the next day. Once she has molted she is immediately ready to form a new clutch of eggs, but first needs the male's contribution as the eggs are fertilized as they pass by the deposited spermatophores. The male will lift the female's tail and turn himself onto his back and join with the female. It is at this time that the male applies spermatophores or sperm sacs close to the opening of the female's genital duct. The sperm sacs are shed from a pair of holes at the base of the last legs and the eggs from holes on the third legs.

  Within 24 hours of mating, the female spawns, releasing eggs which become fertilized as they pass by the spermatophores. The female holds the fertilized eggs in a brood chamber under the abdomen "glued" onto hairs of the pleopods. The eggs remain attached to the female during incubation. When mating is completed, the male will "piggy back" on the female to guard her against the advances of other males. He will continue to be protective of her in this manner until she forms a new clutch of eggs. Once the new clutch is formed the female will reject the advances of all males, including her mate.

Photo by Charles Raabe   Photo by Charles Raabe   Photo by Charles Raabe
              The male guarding the female                               Male lifting the female to gain access                                 The actual mating event


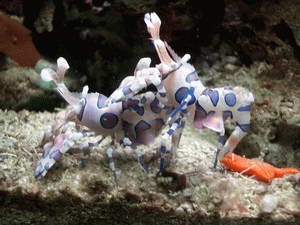
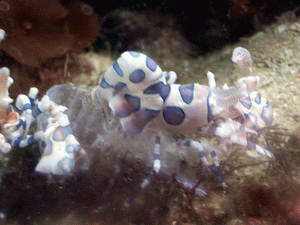
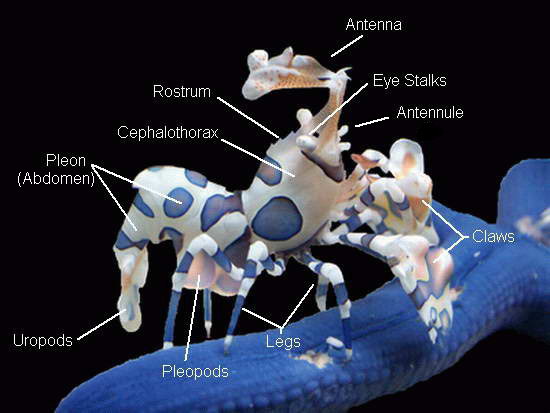
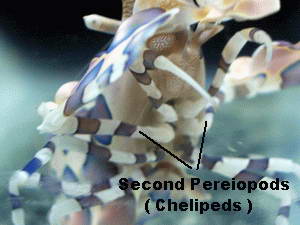
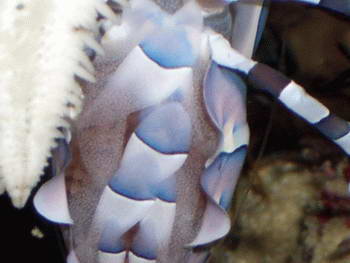
  When compared to other shrimp species, the harlequin shrimp seems to come with some extra parts, or parts that are not easily identified as to what they are due to their flamboyant structuring. Trying to find, let alone determine, what the various head and claw structures are can be a bit of a challenge as the shrimp tends to shield itself, making its smaller details difficult to see.
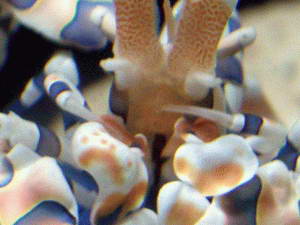
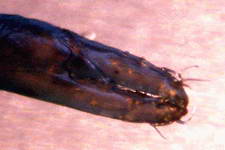
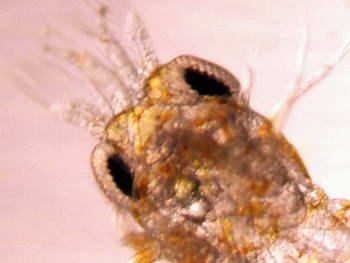
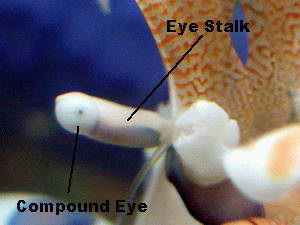


   Photo by Charles Raabe  The eyes appear to be well developed and allow the shrimp to make out details, if the object is close enough. From a distance, they most likely can only make out movement and the differences between light and
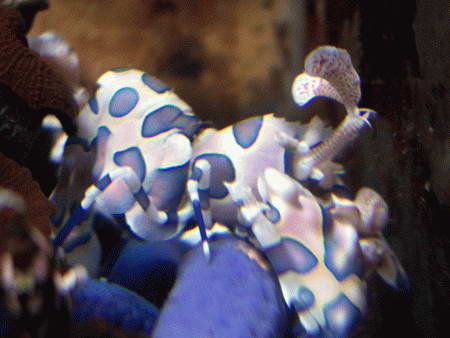
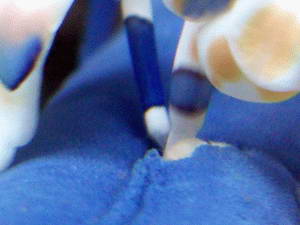
 dark objects.

   Photo by Charles Raabe   
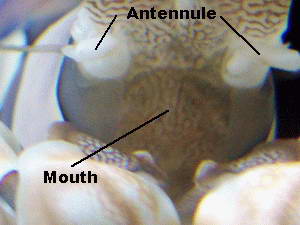
The mouth is not readily visible since their food particles are extremely small, hence no need for a large opening. The mouth can be seen as the vertical slit shown in the photo.
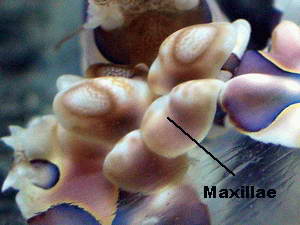
   Photo by Charles Raabe  
The Maxillipeds are appendages modified to function as mouth parts in some shrimp species. I have not seen the Harlequin shrimp use them as such. In this species they may serve more as a means to recognize friend from foe as mated pairs often touch with their maxillae as if taste testing each other.

    The Pereiopods :   All shrimp have five pairs of Pereiopods ( legs ), most of which serve specialized or multiple purposes. Usually only the last three pairs are used for walking, while the first two pairs are modified to serve as claws for gathering food and as weaponry.

   Photo by Charles Raabe   Photo by Charles Raabe   Photo by Charles Raabe
Photo by Charles Raabe Photo by Charles Raabe
Details of first pereiopods, which rules out their use to inject vemon as some believe is possible
  The first Pereiopods, or feeding claws are unique with the harlequin shrimp due to their specialized use. These are what the shrimp uses to break into the starfish by nipping away small bits of the starfish's external structure (skin?) until an open wound is made large enough to insert the feeding claws. The shrimp then switches to using them to tear away small pieces of the starfish's innards and transfer them to the mouth.

   Photo by Charles Raabe   Photo by Charles Raabe
     
The second Pereiopods, which are armed with a claw (chela) are referred to as Chelipeds. The claws of the harlequin shrimp do not appear to serve any purpose other than as offensive and defensive weapons. They are used offensively to "pinch" an opponent or defensively as a shield when under attack or feeling threatened. I have also noticed that when feeding, the shrimp will use its large claws as a shield to hide its feeding activity. This is most likely done to prevent drawing attention to the movements of feeding and to protect its vulnerable mouth parts.

  The third, fourth and fifth pairs of Pereiopods are primarily used for walking. The pereiopods also bear the sexual organs, which are the third pereiopod in the females and the fifth pereiopod in the males.


  FAQ -
" Can I keep more than one pair in an aquarium? "  This would of course depend upon the size of the aquarium. Being that these shrimp are very territorial and defend their mates, I would only attempt a second pair in very large aquariums. Even then, there is no guarantee that one pair or the other will not seek out and attack their rivals. The males may also attempt to move in on the other males female. I would not risk it myself.
   " Can I keep other species of shrimp with the Harlequins? "   Again, in larger aquariums that give each species its own territory, I see no problem in keeping other commonly kept species of decorative shrimp in with the harlequins. If there is a squabble over territory, or if threatened, the harlequins are quite capable of warding off any would be aggressor. This of course does not mean that species such as the mantis and some pistol shrimp species are acceptable.
   " Is there an acceptable food alternative for harlequin shrimp? "  No, not that I am aware of. Starfish are their only food source. This factor alone should be a large consideration when deciding if you are going to keep this species of shrimp or not. Some would argue, and with good cause, that the keeping of harlequin shrimp places an unnecessary strain on wild starfish populations. This is a moral decision that I will leave up to you.
   " Do harlequin shrimp inject the starfish with a toxin to make it stay still while feeding? "  No, there are no shrimp capable of envenomation. What happens is that as the starfish falls under the grasp of the shrimp it simply withdraws and remains still while under attack. As long as the shrimp remains on the starfish and constantly picks at it, the starfish will feel constantly under attack and remain withdrawn, unwilling to move. Should the shrimp move off of the starfish and the starfish has not been gravely wounded it will try to slowly crawl away.  Should the starfish die and start to decay, the shrimp will move off of the starfish. This should be your clue to remove the corpse. I also believe that this is the one reason that harlequin shrimp do not attempt to capture and eat the fast moving brittle starfish, simply because brittle starfish do not withdraw and remain still. They put up a fight of sorts and do not ever give up in trying to get away. This along with their quick actions makes it impossible for the shrimp to keep the brittle starfish under control. If harlequin shrimp were capable of toxin use, then the brittle starfish would be just as vulnerable and readily eaten as are other starfish species. For verification of this information, please see this thread within Dr. Ron Shimek's forum.

MY ATTEMPTS TO DATE

  In the hopes that what little I have accomplished so far will encourage others,  I am making what little progress I have had available online. I hope that you will also attempt to raise your larvae and contribute any knowledge gained. None of my previous attempts have seen any of the larvae reach the settlement stage which I believe was simply due to water quality issues. Hopefully I am past that point now and will continue with my efforts.

  I must state right up front that I am not in this for financial gain. You will find that the costs and limitations of a home based breeding program will ensure you might, at best, break even. But, don't count on it.  Such breeding attempts, in my opinion, should not be based on possible monetary gains but as a chance for you to contribute to the hobby and take just a little more pressure off of the wild stocks. A labor of love if you will.

  In order to collect the larvae when they hatch out, it is important to provide the adults with a dedicated tank of their own. This can be anything from a ten gallon tank on down to just a couple of gallons. Trying to collect all of the newly hatched larvae from a large reef aquarium and all of its filtration will be nearly impossible. Keeping small dedicated systems ensures you have at least a fighting chance of noticing a hatch and being able to collect enough of the larvae to make such an endeavor worthwhile.

  To be fair, I must warn you that this endeavor will be one of trial and error, with a good bit of luck tossed in as well. One little mistake made along the way can cause you to start all over again. But if you stick with it, you will hopefully master this art and contribute to the knowledge base of breeding and raising a marine species. Just having a batch of larvae hatch out is enough to get me excited while looking forward to the upcoming challenges. Yes, it is a challenge, and one that takes a good bit of dedication to see it through. Get lazy one time, and you can lose all the larvae very quickly. Thankfully, the shrimp breed often enough that you will not have long to wait before you get another chance.


Photo by Charles Raabe


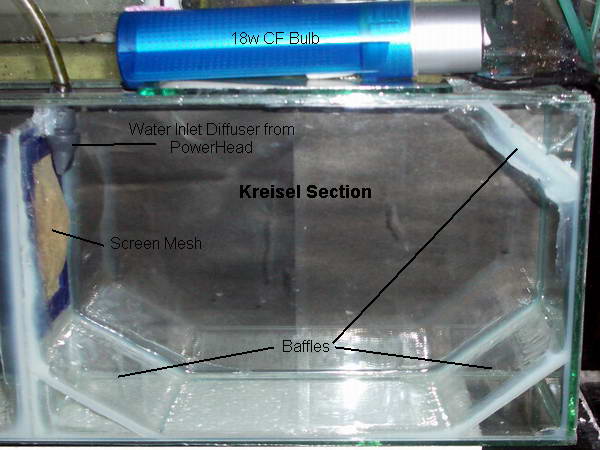
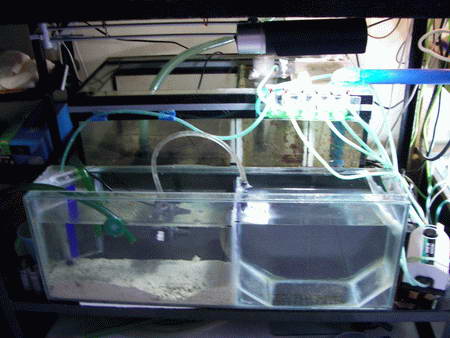
  Since my wife and I live in a small apartment, I found it necessary to limit the size and scope of my breeding program by designing a simple, compartmented kreisel design. Such a design allows me to keep the station near my reef aquarium. As I stated earlier, I use water from my reef for partial water changes to the breeding station. Of course, you can use prepared salt mixes when doing the daily partial water changes, but I prefer to use the water from my reef aquarium as it makes the chore a very simple matter. If you do the same, please ensure that your reef aquarium's water is of very high quality. Any problems with phosphate and nitrate levels will have a very detrimental effect on the larvae.

  Since the station sits directly in front of my reef aquariums sump, its only a matter of siphoning out a quart or two from the station's compartments and refilling the station directly from the sump. I then pour the station's old water back into the sump which allows my reef aquarium to cleanse the old water. Not only is avoiding mixing or collecting new salt water a time saver, it also prevents any shock issues to the larvae and adult shrimp with new water. This is where keeping the station scaled down in size comes in handy since everything that is done to it involves small amounts.

  I can not stress enough the importance of having a kreisel to rear the larvae. I have tried the air line in the corner method. It becomes a real pain trying to find just the right amount of bubble flow that will do the least damage and yet still provide the proper aeration. No matter how slow of an air flow I provide, the larvae are all lost by the second day due to having been pulled into the bubble flow and damaged. I quickly grew tired of this and experienced the total loss of a good number of hatches.

  A kreisel can be bought or custom made by any number of shops that work with custom acrylic fabrication. Since I do not have that luxury in the Philippines it was up to me to build my own. I found this quite easy to do. It required nothing more than a few small pieces of acrylic, a bit of nylon stocking and a very small powerhead with a length of hose that fits the outlet of the powerhead.


The Station
Copyright by Charles Raabe

  As you can see in the above photo, it was not all that difficult to build. I had a custom aquarium built at a glass shop that allowed for it to be placed in front of my reef tank's sump. The dimensions used to built this system were for space saving measures only and can of course be modified to fit your needs.

  For the kreisel section, I used a piece of acrylic (had to buy a picture frame and cut it up) to form another divider to create a pump and aeration area as well as having a screen mesh installed. There were only two concerns kept in mind while building this system, water quality and getting the proper circular water motion within the kreisel section.


Copyright : Charles Raabe

  For the mesh screen, you can try other material such as micron filters, but I have found that cutting up a simple pair of lady's nylon stockings works very well. I do not have a clogging issue and the larvae and their copepod food can not pass through. The baffles shown are simply small pieces of acrylic cut to fit snuggly and siliconed into place. The powerhead was the smallest one that I could find (50 liter per hour). You do not need a strong flow to create a gentle circular current within the kreisel section.

  For me, the beauty of this system is in providing the proper circular flow, while aerating the water with no concerns of killing the larvae. This is done by building an air bubble trap in the back corner of the pump compartment. By doing so, you can run all the aeration you want with no worries. This confines the bubbles to the back corner, avoids making a mess with salt water spray and keeps the bubbles from the pump intake so there are no micro bubbles in the kreisel to damage the larvae.


Copyright by Charles Raabe   Photo by Charles Raabe

  The above photo shows what the bubble trap that I created looks like. By the way, this design is very handy for use on all small aquariums that are aerated by air stones. For the details on how to construct one, please see my Air Bubble Trap Web page. Once you have your flow adjusted within the kreisel, and with a clean screening mesh, I mark the water levels as noted in the above photo, between the kreisel and filtration compartments to allow for the monitoring of any evaporation. Such marks also makes it easy to see when the screening mesh is becoming clogged up and needs cleaning. I also write the hatch dates of the larvae within the kreisel as a means of keeping tabs on their age.


Photo by Linda Raabe

  The Kreisel fully cycled and in action. Note the sandbed in the filtration compartment, this was added to provide the required biofiltration. Also, the light was moved well above the Kreisel to prevent the bulb from heating the water. As long as the light is positioned above the kreisel section, the larvae remain suspended in the water and are not attracted to any one point.

  A few tips if you decide to build a similar kreisel design -

  •   You can use any sized aquarium that you wish, although the smaller ones such as I have used, are easier to work with. Their needed water changes do not require a great deal of water, maybe a gallon at the most.
  •   Get a small powerhead with a flow valve since even with such a small powerhead, I have to turn the flow valve to just above the shut off point to get a nice gentle flow going.
  •   Make the hole for the mesh screening as large as you can, this allows a much slower flow to go through the mesh which prevents any larvae from being pinned against the mesh by a higher flow rate. A small opening would force the water to blast through it.
  •   Make the divider piece a bit lower than the top of the tank. If the mesh should become clogged, the water can overflow the top of the divider back into the pump area and avoid having the tank overflow and flood the house.
  •   Keep the compartments relatively small, this not only makes water changes less of a chore, but also helps in keeping the larvae fed. I do not have to put a great number of copepods in with the larvae to get the concentrations needed to ensure that they have enough nearby food to catch. In a larger set up, it would take far more copepods to create the same live food concentration.
  •   Paint the outside back and left side (kreisel side) black as the larvae will be attracted to any light sources. Since they are going to do this no matter what you do, I prefer to take advantage of that fact and restrict the light to being only able to enter the kreisel opposite of where the screen mesh is. This keeps those larvae that do get out of the circular flow away from mesh and the need to get themselves off of it.
  •   If you do use nylon stocking material, be sure that when gluing it into place with silicone, that you stretch the material tightly or it will stretch out too much when in use. I also used some old aquarium trim (the blue shown above) to pin down the stocking material with silicone and to give it a framed look.
  •   If the nylon screen should start to become clogged, as will be evident by the higher water level within the kreisel section, I simply use the siphon hose when doing the daily partial water change to clean the kreisel side of the screen. I prefer to use a length of airline tubing as the siphon hose, its small diameter gives me greater control of what is, and is not being siphoned out.
  •   The pump compartment can also be used to provide biological filtration by placing a shallow layer of sand or even some bioballs within it. I would not use rock rubble as you would most likely face a problem with debris building up underneath it all. With just a shallow sand bed, it can be lightly vacuumed if ever needed, which I have never had to do. Anything such as bioballs, should be easy to remove to gain access to the floor of the pump chamber if cleaning is ever needed. I also leave any algae growing on the glass as well. This not only provides a bit of nutrient uptake but also gives any errant copepods a place to live and multiply, hopefully surviving the journey through the pump to end up as larvae food in the kreisel section.
  •   Quite a number of copepods can be maintained in the kreisel section by simply feeding them a small amount of phytoplankton each day. Not only will this keep the copepods alive and enriched for the shrimp larvae, it also encourages the breeding of the copepods which can and will hatch out in the kreisel section. While being small enough to pass through the kreisel's screen, it appears to do the copepod larvae (naupalii) no harm to make the journey through the pump section as I continue to find a great many naupalii within the water at all times. The phytoplankton will also help with water quality by up taking nutrients as it reproduces also.


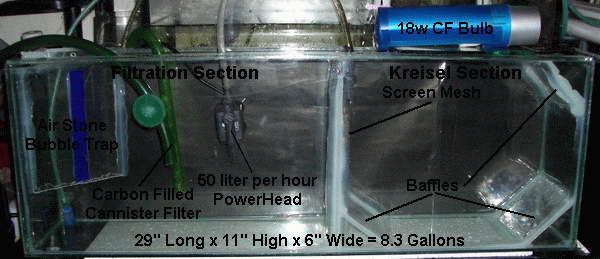
  This is normally quite easy since in the wild mated pairs are commonly collected and kept together to be shipped out and sold as mated pairs. Obtaining such a pair should be a simple matter of doing an online search or having your local store order a pair for you. If you only need a single individual, should one of the pair die, then the store should be able to distinguish between the sexes, allowing you to order a male or female replacement. If the store employees do not know how to sex the harlequin shrimp, you can describe how to do so (described below) or you can shop elsewhere if you are not comfortable with their
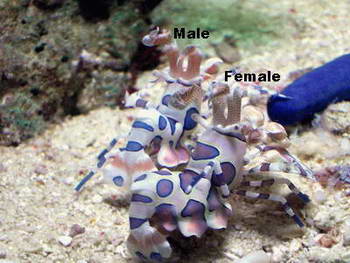
 ability to do so.

  If you do find yourself with a single shrimp, introducing another male or female is usually quite easy since a lone harlequin shrimp is usually very receptive to gaining a mate. To lessen any risks, I would place the new shrimp at the far end of the tank and allow them to find each other in their own good time. Tossing the new shrimp right down in front of the established shrimp may instigate a defensive strike just out of fear. Such strikes could cause unnecessary damage to the shrimp.


    Once you know what to look for it is fairly easy to tell the sexes apart. When mature, the female will appear obviously larger than the male. The best, and most accurate method is by getting a look under their abdomens. The male's abdomen will be clear or yellowish in color, lacking any blue spots. The female will have obvious blue spots under her abdomen and usually the very telling egg mass as well.
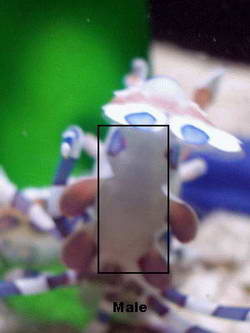

  CopyRight - Charles Raabe   CopyRight - Charles Raabe   CopyRight - Charles Raabe


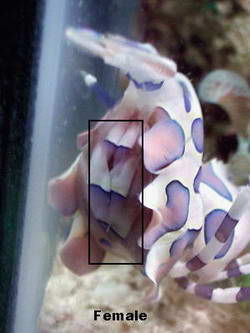
    While in the process of laying a new clutch of eggs, the female may go into hiding for a day or two. I have never seen the actual egg laying take place, yet am always happy to see her return with a new clutch of eggs. While the female is carrying eggs, she will paddle her pleopods quite often in order to aerate the eggs. She will also spend a good deal of time picking at the eggs, which I assume is done to keep them clean of any debris and to remove any unfertilized eggs.

Photo by Charles Raabe    Photo by Charles Raabe3

  Depending upon the temperature of the water, the eggs usually develop and hatch out within 2 to 4 weeks. Since I keep my shrimp's water in the low to mid 80's, and the adults fed well, two weeks is usually the period between spawning for my pair. I usually start checking for larvae in the parents' tank ten days after noticing a new clutch. I do this by placing a small pen light against the aquarium after the room has been dark for a few hours and look for free swimming larvae. Just as other crustaceans and their larvae are attracted to light, so are the shrimp larvae. This makes their collection much easier as well.

Photo by Charles Raabe   Photo by Charles Raabe
The Females Egg Mass


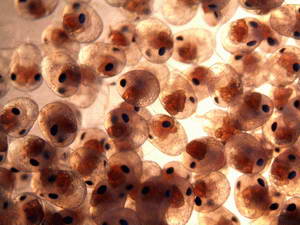
  When the female senses that the time is near, she will climb to the highest point of the rock work during the middle of the night, usually between 1:00 – 3:00 AM. I say usually, because I have had females broadcast their spawn at 11AM, with all the lights on, as well. During her broadcasting, she will briskly fan her abdominal pleopods casting her newly hatched young out into the currents.

  Thus begins the pelagic life of the shrimp larvae. In the wild for a number of weeks the larvae will drift about on the ocean currents as part of the plankton. They will feed upon their fellow plankton members, mostly the copepods that make up the bulk of the zooplankton.

  When you first notice a new hatch, you will of course want to remove them to the larval rearing tank. Prior to moving the larvae, you should drain out half of the water from the larval rearing tank and fill it back up using the water from the parents' tank to avoid any shock or acclimation issues.

  Collecting the larvae can be accomplished by simply holding a small pen light to the side of the parent's tank and scooping up the larvae with a small cup or vial. Since my adult pairs are kept in small tanks, it is quite easy for me to use a white plastic spoon and gather up as many as I can in each spoonful. The white background of the spoon makes seeing the larvae very easy. Do not be tempted to use a siphon hose to collect the larvae. While it may be faster and easier, I feel it poses too much risk of damaging the fragile larvae.

  You can also devise an automated larvae collection system which is detailed in April Kirkendoll's book "How to raise and train your Peppermint Shrimp". I highly recommend this book as most of the information she provides can be used or adapted for use with harlequin and other shrimp species. I personally found it a great source of information to get started with.


  Photo by Charles Raabe  
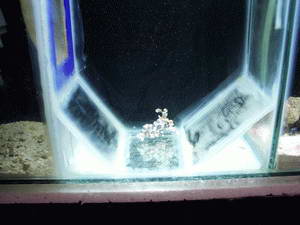
Another method used involves moving the female to the larval rearing kreisel or tank to broadcast her spawn. If the kreisel has a slow flow the female should not have to be kept contained in any manner within the kreisel or larval rearing tank as she is quite easy to capture and move.

  This method is most likely the best, since you are not stressing the larvae or damaging them in any manner through your collection efforts. Once you have noted the normal time period between spawning, you should move the female at least two to three days prior to her estimated date of spawning. Since harlequin shrimp are not known to consume their own young, the precautions taken with other species of shrimp are not needed. Once she appears to have finished spawning, simply catch her using a small cup (so as not to damage her with netting material) and return her to the adults' tank.


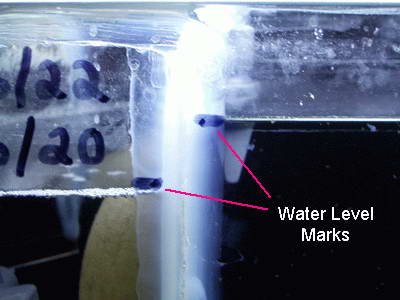
  This will take some daily maintenance on your part. Your most immediate task will involve ensuring that their water quality remains pristine. The only way you will be able to do so is by performing small water changes each and every day. Skip a day, and you risk losing your larvae. Ammonia and nitrites are very deadly to the larvae. These water changes will also be used to siphon out any and all debris that may accumulate. I use a foot long piece of rigid tubing that is attached to a length of airline tubing. The smaller diameter allows greater control over what you are siphoning out and poses less of a risk of tossing the 
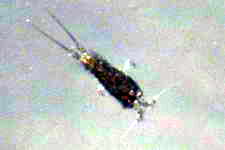
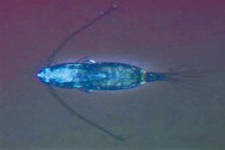
baby out with the bathwater, as would happen with larger diameter hoses.

  If you can avoid putting your hands into the water, do so. This will prevent less of a contamination risk. Before you throw away the water you siphoned out, it is a good idea to inspect the water for any hapless larva that got siphoned out. I simply use a plastic spoon to scoop up the larvae and return them to their tank.

  With this tank being near filterless, I must stress again the importance of doing water changes and siphoning out any debris on a daily basis. Without much of a biological filter established, it will not take much debris to quickly pollute the water. This is all extremely important for the first few weeks of this tank being set up. After three or four weeks, the bacterial and algae film on the glass should help in maintaining water quality and you may be able to skip a day or two depending on how much you feed the tank. This is yet another area that you will have to use your judgment and experience to gauge whether you can get away with taking a day off or not.


  After having read a few studies done with the feeding of larval shrimp, I now only feed my larvae a cyclopoid species of copepods and only resort to the use of brine shrimp when I am unable to collect copepods due to the weather. In these studies, it was noted that when the larvae are fed brine shrimp, the rate of larvae loss is extreme, upwards of 96 percent. This may explain my first poor attempts at keeping the larvae alive long enough to settle out as I had assumed that baby brine shrimp would be an adequate food source for the duration of the larvae development. Harlequin larvae do not swallow food whole, they catch food and chew on it, so food size is not very critical, although being too small is no good as the larvae will most likely ignore small food sources.

  I have also noted that harlequin shrimp larvae are relatively large compared to other commonly kept shrimp species and are quite capable of consuming copepods during their entire larval stage(s). Having wild collected copepods also ensures me that their food source is already naturally gut loaded. For those of you who must culture their own live food, I would first master the art of breeding and raising copepods in order to have a ready supply on hand. There are a great many resources online to guide you in the set up and culture of live foods. Of course, you can also buy your live food(s) directly and avoid having to culture your own. This may become expensive though and could also endanger your larvae if for what ever reasons, your shipments are delayed or lost.

  The one great advantage we have over breeding other shrimp species is that other such species, such as the peppermint shrimp, must have their food source available within a matter of hours after hatching. This means those who do raise such shrimp must be forever on guard to collect the newly hatched larvae or risk losing them to starvation. We, on the other hand, do not have to stay up all night watching for the hatching event as the harlequin larvae can survive up to five days without eating. I do not suggest that you wait that long to move the larvae or provide them with food, but it at least allows us to get a full nights sleep and can collect them at our leisure the following morning after a hatching event.

  If the adult shrimp are being kept in an aquarium that has power filtration or water pumps of any sort, then it would become important to catch the newly hatched larvae right away so as to avoid them being trapped in the aquarium's filtration. This is yet one more reason that I keep my breeding pairs in small, dedicated tanks using nothing more than an air stone, a layer of sand and a bare base rock or two.

  Commercial dry foods are available and have been used for other shrimp species. This is something I have not tried and doubt that I ever will. I do not have such foods available to me here and can not test if such foods are a viable alternative for harlequin shrimp larvae. If you do decide to try either the dry or frozen commercial mixes, keep in mind that the food must remain suspended in the water. If it drops to the bottom, the larvae will ignore it, just as they do with live foods that are not moving. My biggest worry with prepared foods would be in their polluting the water quickly.

  One other point I would like to make about feeding involves the size of the aquarium used for the larval rearing tank. I personally prefer a much smaller aquarium simply because it takes a lot less copepods to create a large concentration of food for the larvae. This is important as the larvae do hunt by sight and will chase and hunt down copepods as they swim or drift by. Having a good concentration of copepods ensures they have a chance of catching their food.  In a large tank, the chances of their food bumping into them is greatly reduced and may effect the survival of the larvae. I would keep to an aquarium no larger than five gallons. With that said, the smaller aquarium will be a bit more demanding on you to ensure good water quality, but I feel the extra maintenance is worth the trouble if it means the larvae are being fed well.

  If you have the choice of copepod species, I have found that the Cyclopoida (cyclops) species are best, simply because they remain free swimming in the water column and do not crawl on the glass or substrates as other species do. The larvae would have a hard time trying to visually hunt them as well as being unable to grab them off of the glass or unable to find them at the bottom of the kreisel. In my opinion, the Harpacticoid species of copepods are unsuitable as a harlequin larvae food source. If Cyclopoid species are unavailable to you, the Calanoid genus may offer some alternatives. Acartia tonsa eggs are now available through AlgaGen.com.  Please let me know if you are aware of any other sources of copepods through my Contact Page. Thank you.


 Photo by Charles Raabe  Photo by Charles Raabe  
                                    A Cyclopoid species of copepod      A Harpacticoid species of copepod            A Calanoid,  Acartia tonsa


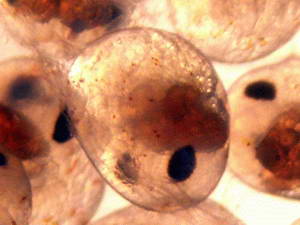
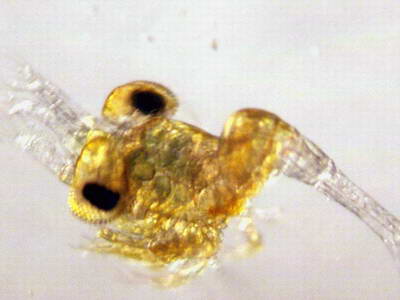
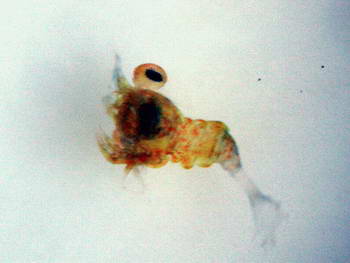
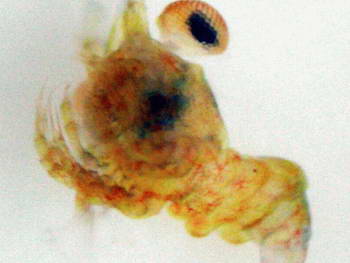
  If you have access to a microscope or a quality magnifying glass, you can remove one of the larvae every few days and watch the changes they go through after each molt. I find it fascinating to see how after each molt, they gain another body part or two. Do not be surprised if on occasion you can not note any changes as shrimp larvae are known to perform "mark time" molting which appears to be a slowing or delay mechanism for reasons unknown. Such molting extends the length of time the larvae remain in a specific stage of their development, which is why it is impossible to say with certainty how long a given shrimp species larval period will be. For the harlequin shrimp, the average is between four to eight weeks.

  If you do decide to examine your larvae, ensure they do not remain outside of their holding tank longer than a few minutes. They are very sensitive to the changes in temperature and salinity that will occur if left on a microscope slide or in a small shallow container.

Photo by Charles Raabe - Copyright 2007   Photo by Charles Raabe Copyright 2007
  DAY ONE: Upon hatching, the harlequin shrimp larvae appear much more developed than the other commonly kept shrimp species such as the peppermint shrimp. They do not have to eat within their first few days, although I like to start them out right away on baby brine shrimp and switch over to copepods after one week.

Photo by Charles Raabe   Photo by Charles Raabe
  DAY TWO : After their first molt, note how their eyes are now more stalked. The mouth parts also appear more developed.


Photo by Charles Raabe   Photo by Charles Raabe
  DAY FIVE Much more developed and are now very aggressive little predators of copepods.


  Thats it, this is as far as I have been able to come with the raising of the larvae. Again, I believe my troubles have been due to water quality issues and hopefully I am now past that point. Having allowed the kreisel to fully cycle for two months should give me a fair chance at success. As with all things Marine, patience will be the first art you must master.  I will of course update this section if, and when I can progress further.


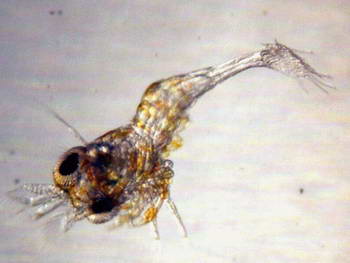
  As you can see, this little endeavor is not for the faint hearted or those not willing to put in the time each day. Myself, I would, and hopefully soon, will take satisfaction in not only being successful with breeding a marine species, but also in being able to make the young adults available to the trade and thus take that little bit of pressure off of the wild stocks here locally. Besides that, its just plain fun! If you have any further questions, you can contact me through my website and I will do my best to get you the answers to your questions. Hopefully this article has covered enough ground to answer the majority of them, or at the least, it got you off on the right foot. I hope you enjoyed it!


  I would like to thank my wife, Linda, for her continued support and understanding while I pursue my many marine interests. A special thanks also goes out to hobby experts, Syd Kraul of Pacific Planktonics, Eric Borneman and Dr. Ron Shimek for their teachings and advice. I also highly appreciate the editorial services that Carmalee Scarpitti contributed. I can only imagine what a herculean effort it must have been to correct my grammar and spelling, Thank you!


            1. Kirkendoll, April, 2001. How to Raise and Train Your Peppermint Shrimp.

            2  Plankis, Brian. 2007. Hobbyists advancing the Hobby, part II : An introduction to Project DIBS  Reef keeping Magazine.

            3. CCIF. 2001.
Analysis of Destructive Reef Fishing Practices in the Indo-Pacific. CCIF Marine Program.


Please take a moment and consider supporting any one of the projects listed within. Thank you.


© 2011 All Rights Reserved
All Photographs and Content are CopyRight Protected
and may not be used or reproduced elsewhere
without written permission of the authors.

Visitor Count since 24 Jan.08


This mirror is being hosted with the permissions of the original content creator for preservation and educational purposes.